So here are my top ten Halloween kid activties!
1. Pumpkin Picking and Painting


9. Halloween Costume Photo Contest

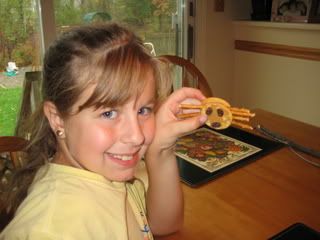
10. Bat Cookies

There are still two days left until Halloween, so check back tomorrow and Wednesday for my last two Halloween kid activities. I promise those will be my last activities about Halloween . . . at least until next year!
]]>So when the room mom from her class called and asked me if I could bring bottled water in for the Halloween party, I foolishly said “How about I make bat cookies?” Seriously don’t know what I was thinking. Oh, yeah, I remember. I wanted to encourage my daughter’s enthusiasm about studying bats and she loves it when I make treats for her class parties. So bat cookies it is.

The ingredients for bat cookies are:
- 1 1/2 cup flour
- 3/4 cup unsweetened cocoa
- 1 1/4 tsp. baking powder
- 1/8 tsp. salt
- 3/4 cup softened butter
- 1 1/4 cup white sugar
- 1 egg
- Small red cinnamon cookie decorations
-
Bat cookie cutter
To make bat cookies:
1. Mix together the flour, cocoa, baking powder and salt, then set aside.
2. Cream together the butter and sugar.
3. Beat the egg in the sugar mixture.
4. Stir the dry ingredients into the sugar mixture to form soft dough.
5. Flatten the dough, wrap it in wax paper and chill for two hours.
6. Preheat the oven to 375 degrees.
7. On a lightly floured surface, roll the dough so it’s 1/8 inch thick.

8. Press the bat cookie cutter firmly into the dough and place cookies 1 1/2 inches apart on a lightly greased cookie sheet.

9. Put the red cinnamon candies on as the bat’s eyes.
10. Bake for 6 to 8 minutes.
11. Let cookies cool.
]]>Let’s change the subject. Oh yeah, the subject is spiders. Well, these Halloween spiders I like!

This is what you need to make Pipe Cleaner Spiders:
To make these cute Halloween spiders:
1. Tightly coil the end of one pipe cleaner around the tip of your finger three times to create the spider’s head. (Tuck the end of the pipe cleaner inside the head.)
2. Then coil the rest of that pipe cleaner around your finger to create the spider’s body.
3. To make the spider’s legs, cut another pipe cleaners into thirds.
(Unfortunately, these spiders are not anatomically correct because they only have six legs! You’re welcome to try and squeeze eight legs on, but we settled for six.)
4. Bend the three pieces of pipe cleaner into the letter “M” and insert them into the body of the spider.
5. Glue on googly eyes.
Now place these furry little spiders somewhere they won’t get killed by mistake!
]]>Getting an indulgent new fall-colored jewelry line is usually beyond my budget, especially after I’ve bought school supplies for three kids. But that doesn’t stop me, as I have always loved making jewelry, and making several sets like the one below costs less than $25. You may be surprised to find out that not only is it easy enough for an 8-10+ year old to do, but you can make jewelry so dang adorable with your children that even you will want to wear these pieces.
See what I mean?

Even better - I made this set in less than an hour. And although I have made jewelry before, this is the first time I have put together a set like this, and it was the first time I worked with head pins. (Read :: yes, you can pull this off, too!)
Here are the materials you will need to make this autumn-inspired jewelry set. I got them all at my local Hobby Lobby, but Oriental Trading has a fantastic and inexpensive collection of beading supplies online.

- Needle-nosed pliers with a wire-cutter at the base
- Head pins (long, straight pins that have a blunt end)
- Jewelry chain (recycle an old necklace to save $$ - you won’t need a clasp, either!)
- Jewelry clasp (I used a fancy but inexpensive toggle clasp that looks like metal flowers & leaves - super cute!)
- Beads of your choice
(I ended up not needing to use a lot of what is pictured above)
Step One :: Build your base chain
Remember you can skip this step if you are using a recycled old necklace or charm bracelet chain.
 Measure the length of the necklace or bracelet you want to make. Pry open the end links and slip on your clasp. This part is where your kids may need a tiny bit of help, because some chains are harder to bend than others. Sometimes using two pliers helps.
Once the clasp is on the link, use the pliers to carefully bend the link back into a closed circle.
As you can see from these photos, I put a charm on the end of the chain, and added the toggle portion of my clasp a few links up - this way I have a little trailing charm hanging down the back of my neck or wrist. You can also just attach your clasp to either end of the chain - it’s up to you.

Step Two :: Plan Your Beading Arrangement
 Even 3-4 year olds can help with this part, as the head pins are not sharp. Put your beads on the head pins - if the hole in the bead is too big for the head of the pin, use a smaller bead first, then put the larger bead on next (I usually buy small silver-toned beads for this purpose).
At the left is my just-turned 5 year old daughter putting beads on head pins.
Get creative and lay out your beads along your chain to get an idea of where you will attach your beads to the chain:

Step Three :: Clip the Length of the Head Pins
As you can see from the photo below, you will have to use the wire cutter part of your pliers to shorten the length of your head pins before you attach them to your chain.
Otherwise, you will have very long-dangling beads and unless that’s the look you’re going for, the beads won’t lay right.
You want to leave approximately 1/3 inch or 1 centimeter of pin above the top of your bead:

Step Four :: Assemble your Necklace or Bracelet!
 Ah - the fun part! All that is left to do is bend the head pins into a loop around the chain links, like this. Head pins are very soft metal, this part is super-easy.
It may take a little practice for the children to line up the wire so that the cut ends don’t poke out. You want the pin to form a neat tear-drop shaped loop around the chain link and meet up with itself again.
A few tips — count the links between beads and use the same number to space them evenly. Uneven bead spacing looks really obvious when you are wearing the jewelry. Choose fewer bead styles for a more dramatic impact - and an elegant pattern usually looks more sophisticated than a haphazard approach (but randomness can look great, too)!
") Most of all - experiment and have fun! This doesn’t need to be an autumn-only activity - check out this bracelet I made for my daughter that would be perfect with a spring dress and cute pink heels… oh, wait, that would be me with the heels…
Most of all - experiment and have fun! This doesn’t need to be an autumn-only activity - check out this bracelet I made for my daughter that would be perfect with a spring dress and cute pink heels… oh, wait, that would be me with the heels… ![]()
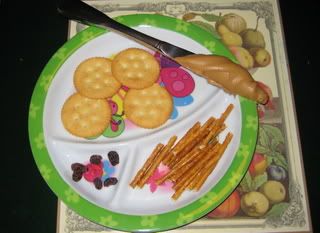
Here’s what you need to make Ritz Cracker Spiders:
- Ritz crackers (surprise, surprise!)
- Peanut butter
- Raisins
- Thin pretzel sticks
Then have your kids:
1. Spread peanut butter on one side of two Ritz crackers.
2. Break four pretzel sticks in half to create the eight spider legs.
3. Place the eight pretzel sticks in the peanut butter on one cracker to create spider legs.
4. Sandwich the pretzel sticks by placing the second cracker on top with the peanut butter side facing up.
5. Arrange the raisins in the peanut butter of the top cracker to make the spider’s face.
Now something for Halloween that is not only good, but good for you!
]]>
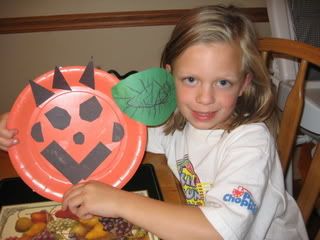
So today I thought I’d share a craft project my daughter made a couple years ago that I unpack and hang up every year at Halloween . . . the paper plate pumpkin. I like this craft not only because it’s festive, but because it helps younger children learn their shapes.
To make paper plate pumpkins you need:
- Orange paper plates (You can also color or paint a white plate.)
- Black, brown and green construction paper
- Glue
- Scissors
Then have your kids do the following:
1. Cut shapes out of the black construction paper to decorate the pumpkin’s face.
(My daughter cut 3 triangles for hair, 2 rectangles for the mouth, 2 hexagons for eyes, 2 semi-circles for ears and 1 circle for the nose. Be creative!)
2. Glue the black shapes on the plate to create the pumpkin’s face.
3. Cut out a leaf from the green construction paper and glue it on.
4. Cut a rectangle from the brown construction paper for the stem and glue it on the pumpkin.
Once your child has completed their paper plate pumpkin, put their name and date on the back so you’re all set to hang it up every Halloween!
]]>While I was tempted to buy the caramel apple making kit in the produce section of the grocery store, I opted for the original way instead. Damn tradition.
Luckily I only needed to buy one ingredient, yes the caramel, because I already had plenty of apples and the popsicle sticks from making this Halloween treat.
Here’s what you need to make caramel apples the traditional way:
- 6 apples
- 6 popsicle sticks
- 1 package (14 ounce) of individually wrapped caramels
- 2 Tbsp. water
- Sprinkles (huh?)
To make the caramel apples:
1. Insert a popsicle stick into the stem of each apple.

2. Place the apples on a cookie sheet covered with lightly greased aluminum foil.
(I didn’t feel like greasing aluminum foil so I used plain wax paper instead. Oops. I recommend you take the time to lightly grease aluminum foil! Live and learn.)
3. Unwrap the caramels.
(Seems obvious, but you’d be surprised! Anyway, I always ask my girls to “test” yummy ingredients to see if they’re okay to use in the recipe.)
4. Put the caramels and water in a saucepan and melt over low to medium heat, stirring often until smooth.

5. Dip the apples in the caramel.
(We found it easier to use a large plastic spoon to pour the caramel over the apples.)

6. Put the caramel apples on the aluminum foil (lightly greased!) and chill until ready to serve.
(We let ‘em cool for about five minutes before we ate them!)
Since one of my daughters said she didn’t like caramel, we decided to change the recipe a little bit. Forget tradition. We added Halloween sprinkles. This way the caramel wasn’t the treat, but merely the glue to keep on the sprinkles!
My hubby and I didn’t use sprinkles because we like our caramel apples the old- fashioned way. Kids these days.
]]>I always want to answer yes, but realize some weeks are crazier than others. So I like to find treats that are not only festive, but easy to make.
“Okay, how about Rice Krispie pumpkins?”
“Yeah! What are those?”
They’re so easy, we made some for fun this past weekend because my girls are just not getting enough sugar this month!
Here’s what you need to make Rice Krispie Pumpkins:
- 1 package (10.5 oz.) of miniature marshmallows
- 3 Tbsp. butter
- 1/8 tsp. salt
- Red and yellow food coloring
- 6 cups of Rice Krispies cereal
- Wax paper
- 6 Popsicle sticks
- 3 Small Tootsie Rolls cut in half
- Black decorating gel
Here’s how to make Rice Krispie Pumpkins:
1. Melt marshmallows, butter and salt in a saucepan, while stirring often.

2. Remove pan from heat and add a few drops of red and yellow food coloring to turn mixture orange.

3. Stir in the Rice Krispies.
4. Scoop the orange mixture onto six separate pieces of wax paper.
(Frankly, the recipe said to butter your hands and shape the mixture into balls, but my kids don’t like their hands to get sticky. I wonder where they get that from!)

5. Wrap the wax paper around the mixture and shape it into six pumpkins.
6. Insert a popsicle stick into each pumpkin.

7. Cool for about a half hour then remove the wax paper.
8. Press a Tootsie Roll half into each pumpkin to create the stem.
8. Decorate the pumpkins with black decorating gel. (We bought black frosting by mistake so make sure you buy the gel because it’s easier to decorate with!)
These Rice Krispie pumpkins are fun, easy and great for Halloween parties!
]]>
Since I know I’m just one of a gazillion parents who likes to take pictures of their kids, I wanted to share this Halloween Costume Photo Contest going on over at Kaboose.com.
You get to enter two of your favorite Halloween photos and have the chance to win a $1,000 gift card.
This photo contest runs from now until November 6, 2007.
So get those costumes and have your kids smile at the camera and say “Halloween!”
]]>All you need for this Halloween craft are HANDS and:
- Black construction paper
- Scissors
-
Googly eyes
(No, these aren’t made by Google.)
- Glue
- White Crayons (If you don’t want to use googly eyes.)
Then have your kids do the following:
1. Fold the paper in half.
2. Trace their handprint on the paper with their wrist by the crease in the folded paper.

3. Leaving the paper folded in half, cut around the fingers, but DO NOT cut the crease in the paper where the wrist was. This is the body of the spider.
4. Cut the thumbs off. (I forgot this part last night and my nine-year-old daughter said “Mommy! Spiders don’t have ten legs. Good point, honey.”)
5. Unfold the paper to see the spider!

6. Then either glue on googly eyes or use white crayon to make the eyes. Since we like happy spiders, my girls drew on a smile with their white crayons.
My girls added their own suggestion last night and made tiny bats with the thumbs they cut off from their handprints. It’s so nice having my own creative team to generate ideas!
I like to do this craft with my girls because I absolutely love anything with their handprints!
]]>This site is full of great online Halloween jigsaw puzzles! Here are some our favorites:
These puzzles will not only stretch your kids’ minds, but the length of time until they ask to open the candy bag again!
]]>I like to decorate for each holiday, but I hate to spend a lot of money on decorations. So I love these ghosts because they’re fun, easy and made from stuff I already had in the house!

All you need to make these adorable ghost decorations are five minutes and:
- White tissue paper
- Rubber bands
- Black Marker
Then follow these easy steps:
- Make a ball out of one piece of white tissue paper for the ghost’s head.
- Cover the ball (”head”) with a flat piece of tissue paper to create the ghost’s body.
- Wrap the rubber band around the “neck” of the ghost to secure the tissue paper.
- Decorate the ghost’s face with black marker.
We made a family of ghosts and put them all around the house to make it look festive!
]]>That’s why I’m so glad I discovered Printables For Kids! This cool website is full of free word searches, word jumbles, mazes, coloring pages and a whole lot more! Now instead of grabbing another puzzle book at the grocery store, I can just print out some activities from home . . . for free!
Today I just printed out some great Halloween activities for my girls to do when they get home from school. They’re going to love the Halloween Costume Parade word scramble, Trick or Treat word search, and the Help the Trick or Treaters Find the Bag of Lost Candy maze!
]]>We picked out five apple recipes and voted. Apple Cider Crisp won hands down. That apple slaw with walnuts didn’t have a chance. Not only was this a delicious dessert, it was Weight Watchers! That means guilt-free eating in our house! For those of you following along at home, each serving is 4 points.

The kids loved making this recipe and it was very easy! I like easy.
Ingredient List:
- 1/2 cup flour
- 1/4 sugar
- 1/4 cup packed light brown sugar
- 1/4 cup butter, chilled and cut into small pieces
- 7 apples peeled and sliced
- 1/3 cup apple cider
- 2 Tbsp. sugar
- 1 Tbsp. fresh lemon juice
- 1 Tbsp. flour
- 1 tsp. ground cinnamon
It’s a easy as One, Two, Three . . .Well, and Four, Five and Six!
- Preheat oven to 375 degrees.
- Spray 8 inch square baking dish with cooking spray.
- Put first four ingredients in a blender and pulse until crumbly. Set aside.
- Mix together the rest of the ingredients in a large bowl.
- Put apple mixture into pan and sprinkle on crumbly mixture.
- Bake for 40 minutes or until lightly browned.
This dessert was so good it didn’t last a day.
How do you like them apples?
]]>We always buy one pumpkin, proportionately sized, to represent each member of our family. As the girls considered a very large pumpkin for “me,” I called out “Hey! Make sure Daddy’s pumpkin is bigger than mine!” Other than that, they get to choose whichever pumpkins they like.
After we choose the five family pumpkins, we always buy smaller ones to paint. This gives my girls something to do with the pumpkins when we get home because once we pick the family pumpkins, they pretty much just sit on the porch and look festive until they rot from the sun.
For the pumpkin painting, I just put a vinyl tablecloth down and give the girls washable paint and paint brushes. They do the rest! It always amuses me how they each decorate their pumpkin differently. After they’re done, we put them outside to dry. But remember to take them in because rain will wash all of the paint off! Trust me, you don’t want to have to learn that lesson the way we did.
]]>Event #7: Freeze Dance
All you need for this event is a CD player and a fun dance CD. Since I had 14 girls ranging in age from 7 to 11, we of course played this one! This game is a combination of musical chairs and frozen statues. When the music is playing, each kid does their craziest dance moves. But they must stop immediately when the music stops! If anyone is caught moving, they are out of the game. Since we were playing with teams, the last person standing won for their respective team. To keep them on their toes (literally sometimes!) I kept turning the music off at different parts of the song. Usually during the chorus when they really liked to strut their stuff!
Event #8: Balloon Tag
For this event, you need to blow up a balloon for each child and tie a piece of yarn to it. The point of the game is for each child to try and pop their opponents’ balloons while protecting their own. To make it competitive, everyone has to hold onto their balloon’s string low enough so the balloon drags on the ground. This way it’s easier to step on and pop! This is a crazy, free for all, but very entertaining!
Event #9: Pony Express Relay
I did need to get some things for this event, but it was definitely worth the effort! You need two cowboy hats, two stick horses
, two beach balls, and two tote bags. (I used the kids’ school bags.) Each kid takes a turn in the relay race pretending they have to deliver the mail. But, instead of the challenges of snow, sleet or rain, they need to carry their mail bag, ride their horse, and wear their hat, all while holding a beach ball between their knees! If they drop the ball, they have to stop and get it into position again before they can continue on their “route.” This event was truly hilarious and a lot of fun!

But the most hilarious and fun event of the whole day was (insert drumroll here):
Event #10: The Clothes Relay
For this event, you need two sets of clothes, with one piece of clothing for all but one child on each team. Since we had two teams of seven kids, we needed six items of clothing for each team. We used hats, scarves, gloves, t-shirts, sweatshirts and shorts. The fact that the shirts, shorts and sweatshirts were my hubby’s definitely made this event more funny! We put each set of clothing at the opposite end of the yard by the orange cone. The rela